Why Your New Brier Home Build Might Be Trapping Moisture Behind the Siding
New homes in Brier WA should feel dry and comfortable but many homeowners discover musty odors, peeling paint, and warped trim just months after moving in. The problem often starts where you can’t see it—moisture trapped behind siding due to building envelope failures common in recent Puget Sound construction. Brier’s combination of heavy rainfall, glacial till soil, and rapid development creates conditions where even brand-new homes can develop serious moisture problems if the building envelope isn’t properly designed and installed. What Kirkland Homeowners Need to Know About Professional Mold Removal on Damp Walls.
Understanding why this happens requires looking at how modern construction methods interact with Brier’s specific climate and soil conditions. When moisture gets trapped in wall cavities it creates the perfect environment for mold growth, wood rot, and structural damage that can cost thousands to repair. The good news is that most of these problems are preventable with proper building science and early detection can save your home from extensive damage. EPA Mold and Moisture Control Guidelines.
Common Moisture Trapping Problems in New Brier Construction
New homes in Brier face several unique challenges that older homes don’t. The area’s glacial till soil drains poorly and retains water, creating hydrostatic pressure against foundation walls. When builders use modern tight-building techniques without proper vapor management, moisture has nowhere to escape. This combination of factors leads to several common failure patterns in new construction. How to Get Fast Water Damage Help in Capitol Hill Without the Wait.
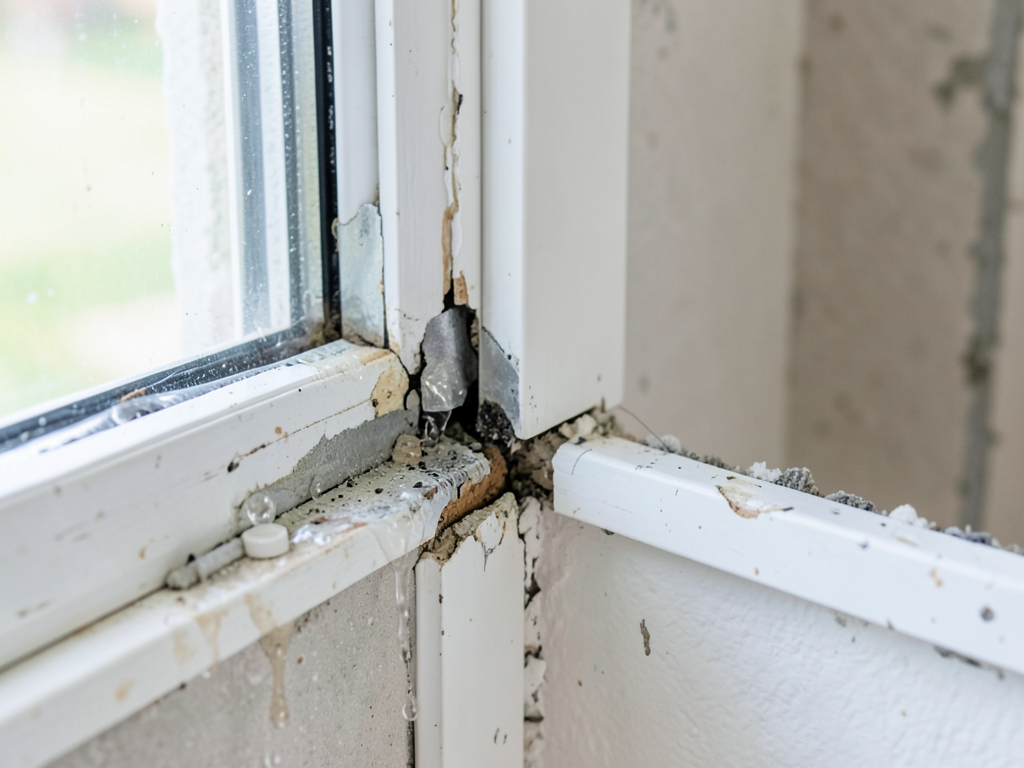
Building envelope failures often start with improper flashing installation around windows and doors. When water penetrates the siding it should drain out through weep holes or flashings, but poor installation creates direct pathways for moisture into wall cavities. Once inside, the moisture encounters warm indoor air and condenses on cooler surfaces, creating persistent dampness that never fully dries. Water Damage Restoration Shoreline.
Another major issue is the use of non-breathable house wraps or improper vapor barrier installation. Washington State Energy Code requires vapor barriers, but when they’re installed incorrectly or when the wrong type is used for our climate, they trap moisture instead of controlling it. This is especially problematic in Brier where annual rainfall exceeds 37 inches and humidity levels remain high throughout much of the year.. Read more about Fixing Moisture Problems in Your Mukilteo Home After a Heavy Fog Season.
Warning Signs Your New Home Has Moisture Behind the Siding
Early detection is critical for preventing extensive damage. The first signs often appear as subtle changes that homeowners might dismiss as normal settling. Pay attention to these warning indicators that moisture may be trapped in your walls.
Musty odors inside your home, particularly near exterior walls or in rooms with poor ventilation, often indicate mold growth behind drywall. These smells may come and go with humidity changes but tend to worsen over time. You might notice them more strongly after rain events or during seasonal humidity changes.
Visual signs include peeling paint or bubbling wallpaper near exterior walls, especially on north-facing sides where drying is slower. Warped or discolored trim around windows and doors suggests moisture is affecting the wood framing behind the finish materials. In severe cases you might see efflorescence—a white, powdery substance—on foundation walls where moisture is migrating through masonry. Document Drying & Restoration.
Temperature differences between rooms can also indicate moisture problems. Damp wall cavities lose heat more rapidly than dry ones, creating cold spots that you can feel by touch or measure with an infrared thermometer. These cold areas often correlate with where moisture is trapped behind siding.
How Brier’s Climate Creates Perfect Conditions for Moisture Trapping
Brier’s location in the Puget Sound basin exposes new homes to specific moisture challenges that builders in other regions don’t face. The combination of high annual rainfall, persistent cloud cover, and relatively mild temperatures creates an environment where moisture management is critical but often overlooked in construction planning.
Atmospheric river events, which bring intense rainfall over short periods, can overwhelm even well-designed drainage systems. When these systems fail, water penetrates the building envelope and becomes trapped by modern air-sealing techniques that prevent natural drying. This is particularly problematic in Brier’s hilly terrain where water flows downhill and accumulates around foundations.
The region’s high relative humidity, often exceeding 70% during fall and winter months, means that even small amounts of moisture intrusion can create condensation problems. When warm indoor air meets cool exterior walls, the moisture in the air condenses on cold surfaces, creating the perfect conditions for mold growth and wood rot.
Glacial till soil, common throughout Snohomish County, exacerbates these problems by retaining water and creating poor drainage conditions around foundations. This soil type expands when wet and contracts when dry, putting additional stress on foundation walls and creating cracks where moisture can penetrate.
Building Code Requirements and Common Compliance Failures
Washington State Energy Code and Seattle Residential Code establish minimum standards for moisture control, but compliance doesn’t always guarantee proper moisture management. Understanding these requirements helps homeowners identify potential problems in their new construction.
The Washington State Energy Code requires Class I or II vapor barriers on the warm side of exterior walls in our climate zone. However, the code doesn’t specify which type is appropriate for different wall assemblies, leading to installation of vapor barriers that trap rather than control moisture. Class I barriers like polyethylene sheeting can be problematic in our mixed-humid climate when installed on the interior side of walls.
Snohomish County building officials inspect for basic code compliance but may not catch subtle installation errors that lead to moisture trapping. For example, improperly lapped house wrap, missing kick-out flashing, or incorrect installation of drainage planes often pass initial inspection but create problems within months of occupancy.
The International Residential Code requires proper flashing and weep systems, but the specific details vary by climate zone and wall assembly. In Brier’s climate, builders need to use weather-resistive barriers that allow walls to breathe while still providing weather protection. Many new homes use house wraps that are too impermeable for our conditions. International Residential Code Chapter 7 Moisture Protection.
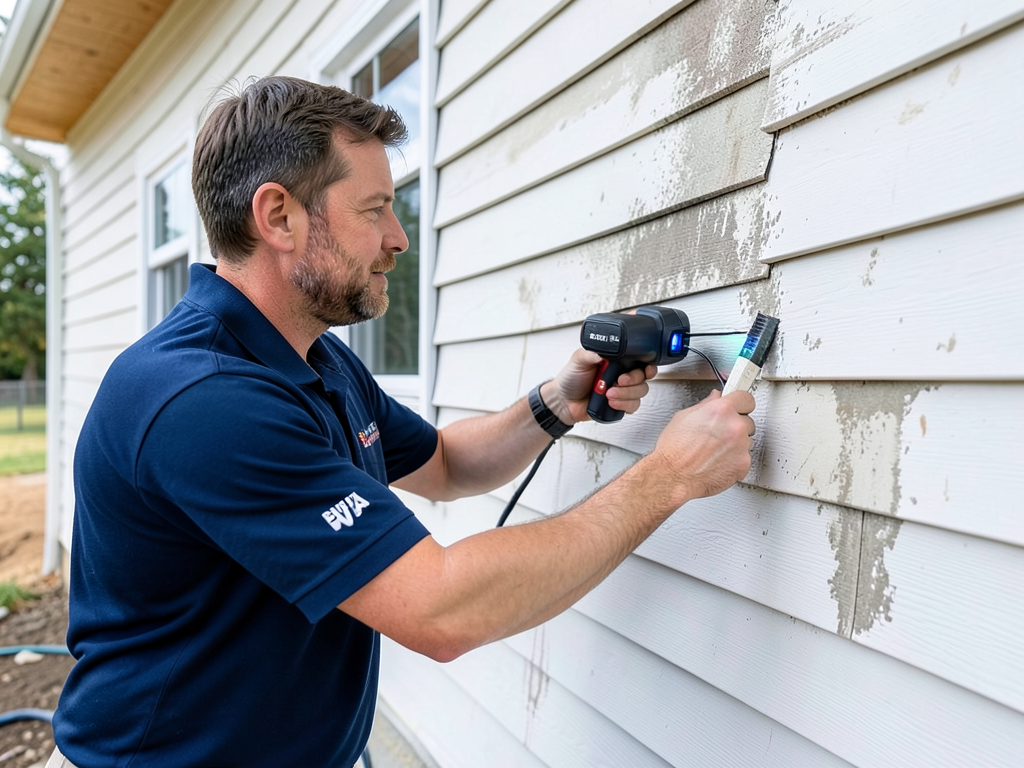
Professional Moisture Detection and Assessment Methods
Identifying moisture problems behind siding requires specialized equipment and expertise. Professional moisture assessment goes beyond visual inspection to detect hidden problems before they cause extensive damage. Why You Need Professional Sewage Cleanup in Bellevue Before Your Floors Are Ruined.
Thermal imaging cameras detect temperature variations that indicate moisture presence. Wet materials conduct heat differently than dry ones, creating visible patterns on infrared scans. These cameras can identify moisture behind siding, under flooring, and within wall cavities without destructive testing. The technology shows exactly where moisture is concentrated and how extensive the problem has become.
Moisture meters measure the actual moisture content of building materials. Pin-type meters penetrate surfaces to measure moisture at specific depths, while pinless meters scan larger areas without causing damage. Professional restoration technicians use both types to create a complete moisture map of affected areas.
Boroscope inspection allows visual confirmation of moisture problems without removing walls. Small cameras inserted through tiny access holes can inspect wall cavities, showing mold growth, wood rot, and moisture patterns. This diagnostic tool provides definitive evidence of problems and helps determine the extent of necessary repairs.
Relative humidity and temperature monitoring over time reveals moisture patterns that single measurements miss. Data loggers placed in suspect areas track conditions for days or weeks, showing how moisture levels change with weather conditions and building use patterns.
Moisture Remediation Solutions for New Brier Homes
Once moisture problems are identified, remediation requires addressing both the immediate damage and the underlying causes. The specific approach depends on the extent of damage and the building assembly involved.
For minor moisture intrusion, professional drying and dehumidification may be sufficient. Industrial-grade dehumidifiers and air movers can remove moisture from wall cavities and prevent mold growth. This approach works when the building envelope is intact and moisture hasn’t caused structural damage.
More extensive problems require removing affected materials to access and repair the building envelope. This might involve removing siding to repair flashing, replacing damaged sheathing, or installing proper drainage planes. In severe cases, sections of walls may need complete reconstruction to address rot and mold contamination.
Crawl space encapsulation can prevent moisture from rising into wall assemblies through the foundation. This involves installing vapor barriers, proper drainage systems, and sometimes dehumidification to control moisture levels beneath the home. In Brier’s climate, this is often a critical component of moisture management.
Exterior remediation might include installing proper kick-out flashing, repairing or replacing house wrap, and ensuring proper drainage around the foundation. These repairs prevent future moisture intrusion while addressing existing damage.
Preventing Moisture Problems in New Construction
Homeowners building new homes in Brier can take steps to prevent moisture trapping before it starts. Working with builders who understand local climate conditions and proper building science is essential.
Specify proper weather-resistive barriers designed for our climate zone. Not all house wraps perform equally in high-rainfall environments. Look for products with high permeability ratings that allow walls to breathe while still providing weather protection. The right choice depends on your specific wall assembly and local conditions.
Ensure proper flashing installation around all penetrations. Windows, doors, utility penetrations, and roof-wall intersections need proper flashing to direct water away from the building envelope. This includes kick-out flashing where roofs meet walls and Z-flashing above windows and doors.
Include proper drainage planes in your wall assembly. These create pathways for water to drain down and out of the wall system if it penetrates the siding. This might involve using rainscreen systems, proper house wrap installation with correct lapping, or specialized drainage mats behind siding.
Consider the impact of your landscaping on moisture management. Proper grading directs water away from the foundation, while plantings near the home should be chosen and placed to avoid creating moisture traps against exterior walls.
Local Case Study: Moisture Issues in Brier’s New Developments
A recent development in the North Brier area illustrates common moisture problems in new construction. Homes built in 2023-2024 began showing moisture-related issues within the first year of occupancy, particularly on north-facing walls where drying is slowest.
Investigation revealed several contributing factors: improper flashing installation around windows, use of non-breathable house wrap in a high-rainfall environment, and poor drainage due to the area’s glacial till soil. The problems were most severe in homes with fiber cement siding, which can trap moisture if not properly installed with adequate drainage.
Remediation involved removing siding on affected walls, repairing flashing and drainage planes, and replacing damaged sheathing and insulation. The builder worked with moisture remediation specialists to develop proper installation details for the remaining homes in the development, preventing similar problems in other units.
This case demonstrates how even new homes in Brier can develop serious moisture problems when building science principles aren’t properly applied. The cost of remediation far exceeded what proper installation would have cost initially, highlighting the importance of getting it right the first time.
Frequently Asked Questions
How can I tell if my new home has moisture behind the siding?
Look for musty odors, peeling paint near exterior walls, warped trim around windows and doors, and cold spots on walls. Professional moisture detection using thermal imaging and moisture meters can confirm problems before they become visible.
Is moisture behind siding covered by new home warranties?
Coverage varies by builder and warranty terms. Most new home warranties cover structural defects but may exclude moisture damage if it results from improper maintenance or environmental factors. Document problems early and work with your builder through proper warranty channels.
How long does moisture remediation take for a typical home?
Minor moisture problems might be resolved in 2-3 days with drying equipment. Major remediation involving material removal and repair typically takes 1-2 weeks, depending on the extent of damage and weather conditions for exterior work.
Can I prevent moisture problems when building a new home?
Yes. Work with builders experienced in our climate, specify proper weather-resistive barriers and flashing details, ensure proper grading and drainage, and consider rainscreen systems for siding installation. Proper building science prevents most moisture problems.
What’s the cost difference between prevention and remediation?
Prevention typically adds 2-5% to construction costs but prevents potential remediation costs of $10,000-$50,000 or more. The cost of proper installation is minimal compared to the expense of fixing moisture damage after it occurs.
Should I have my new home inspected for moisture problems?
Professional moisture inspection during the first year of occupancy can identify problems while they’re still minor and covered under warranty. Annual inspections help catch developing issues before they cause extensive damage.
Take Action Before Moisture Damage Becomes Extensive
Moisture trapped behind siding in your new Brier home won’t fix itself—it will only get worse over time. The musty odors, peeling paint, and warped trim you’re noticing are warning signs of a problem that could cost thousands to repair if left unaddressed. Professional moisture assessment can identify the extent of the problem and determine whether you need immediate remediation or preventive measures.
Don’t wait until you can see water stains on your walls or until mold becomes visible. By then the damage is already extensive and the repair costs have multiplied. Contact a moisture remediation specialist who understands Brier’s unique climate challenges and can provide solutions that address both the symptoms and the underlying causes of your moisture problems.
Your new home should be a source of comfort, not a source of worry about hidden moisture damage. Take action today to protect your investment and ensure your home remains dry, healthy, and structurally sound for years to come.